
Contrary to what one might think, the use of SLR lenses for astrophotography is very popular. Telescopes with their long focal lengths and large apertures give great high magnification views of heavenly objects. This is very desirable when imaging small planetary objects like Jupiter or Saturn. What happens though when you attempt to image a deep space object like the Orion nebula which is 1,500 light-years away and around 15 light-years across with a telescope and a ccd camera at prime focus. Well, if you’re using a telescope like mine you end up with an image like the one on the left.

Not a bad image, but a lot of the nebula is being cut off due to the restrictive field of view. This is how the nebula looks even after using a x.5 focal length reducer to try to alleviate the problem. Inserting a focal length reducer in front of the camera has the effect of reducing the telescopes magnification power and hence giving you a larger field of view.Nevertheless, if the goal is to capture the entire nebula and the space surrounding it, it’s obvious that the telescope/focal reducer approach is not going to work. Here is where SLR lenses come into the game. By simply attaching an SLR lens to the ccd camera and then mounting the camera and SLR lens to the telescope in a piggyback fashion one is able to achieve truly wide field of view imagery.

To the right is an example of what using a 135mm SLR lens attached to a ccd camera can achieve. This is a big difference isn’t it? If you want even wider fields of view it is possible to use 55mm lenses or even 22mm lenses. In all reality there is no limit to what sort of lens one can use. It all depends on the object being imaged and what it is you are trying to accomplish.
One point which I feel is very important to point out is the fact that some SLR lenses can introduce comatic aberration or coma into images. Coma is very easy to detect as it makes its presence felt as stars that look like comets around the edges of your images. This is not a pretty sight and should be avoided at all cost. Surprisingly, the solution to this problem is easier than one might think. It’s possible to suppress coma to a large extent by adjusting the aperture of an SLR lens. Most SLR lenses have a dial which allows this adjustment of the aperture. Normally you will see it labeled with numbers such as 2.8, 4, 5.6 up to 16 or 22. These numbers are the f-ratios of the lens when stopped down to these smaller aperture openings. For example, if you have a 135mm focal length lens, and your f-ratio is 2.8; then your lenses aperture is around 48mm. On the other hand if you adjust the dial until it reads 5.6; then your lenses aperture becomes 24mm. An adjustment of two clicks towards a more restrictive aperture size is normally sufficient to suppress most if not all coma problems in your lenses.

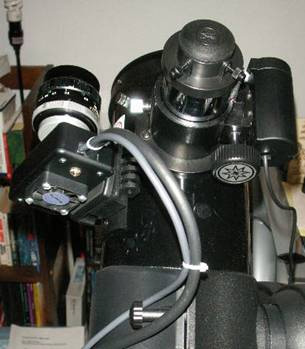
The mounting of the ccd camera and SLR lens to the telescope can be tricky depending on the mount being used. If you’re using an equatorial mount with tube rings which have a piggyback camera adaptor, it’s a simple task to attach the ccd camera and SLR lens to the telescope. To the left is how I was able to attach the camera and lens to my telescope. On the other hand, if the mount doesn’t use tube rings with a camera adaptor you will have to use ingenuity to figure out how to mount the camera and SLR lens to your telescope. Here’s how I mount the camera and SLR lens on my telescope when using the Altazimuth GOTO mount.
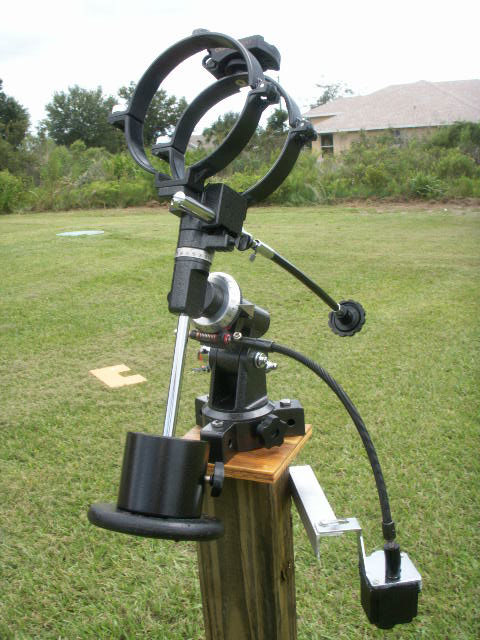
Some time back I modified my SLR camera mount to allow for up and down as well as side to side adjustment. As can be seen on the image to the left, with the old mounting system I could only move the SLR camera left or right. This posed a problem when I tried to adjust the SLR camera to point at the same place the telescope was pointing. My solution to the problem can be seen here. I used an inexpensive laser level tripod mount which uses a ball type swivel to give me the full range of motion I was looking for. So long as all the parts are well tightened the mount works great. One drawback of having the camera so high above the telescope is that more counter weight will be required.

I recently did some experiments using my Fujica ST-701 35mm film camera and wide angle lenses. My goal was to image large portions of the Milky Way. I have long wanted to achieve breath taking shots of the Milky Way like the ones I have seen on the Internet. I knew this to be possible as most of the ones I have seen are from amateur astronomers like myself.
So I set out to see if I could succeed in this endeavor. I used my equatorial mount which is now atop my homemade pillar. I attached the film camera to the mount in the same way as I attach my ccd cameras. I used my 28mm Avitar wide angle lens. I pointed the camera towards the galactic center which was a bit low in the Western horizon and took a number of exposures ranging from 2 minutes to 5 minutes. I used 800 ISO FujiColor Superia, and had it developed at the local WalGreens. I asked for the pictures to also be put into a CD for easier post processing of the images.
Without any post processing the images looked washed out due to light pollution and vignetting. I used PixInsightLE and the DynamicBackgroundExtraction process to salvage the best images. To the right is one such image. This is actually three 5 minute exposures of the galactic center of the Milky Way stacked in Registax4 before putting the image through PixInsightLE. The galactic center is to the right and slightly below Jupiter (the bright object left center). In this image M8, M24, M17 and M16 are all visible. As can be seen, the use of 35mm film and a wide angle lens does allow for true wide angle capabilities. I can’t achieve this level of visibility with my CCD imagers.
Using 35mm cameras in this way minimizes the issues of poor tracking and alignment of your equatorial mount which is such a killer when it comes to film. I didn’t start to see star trails until I exceeded 15 minutes in my exposure times. Even then, I know I can go over this limit so long as the motor is tightly attached, and the mount well aligned. I have taken images of other portions of the Milky Way as well with more to come! They can be viewed in the gallery.
The addition of different focal length SLR lenses to your astrophotography arsenal is indispensable. These lenses give you the flexibility to photograph many more objects in the sky. If you’re going to photograph the Ring nebula or a planet you will probably need to use your telescope. If you want to get a full shot of the Moon or photograph the Horsehead and Flame nebula region all at once, a 135mm SLR lens will do the job nicely. Again, experimentation is going to be your best friend here, so get out there and start experimenting.